fbpx

What Shoes Should I Wear to Train in?

Many people ask this question and many people that don’t ask this question usually wear the worst possible shoes to lift in, hampering their progress and even causing potential injuries.

Good Shoes to Wear When Lifting

Thin, flat shoe that allows you to grip the floor

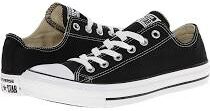
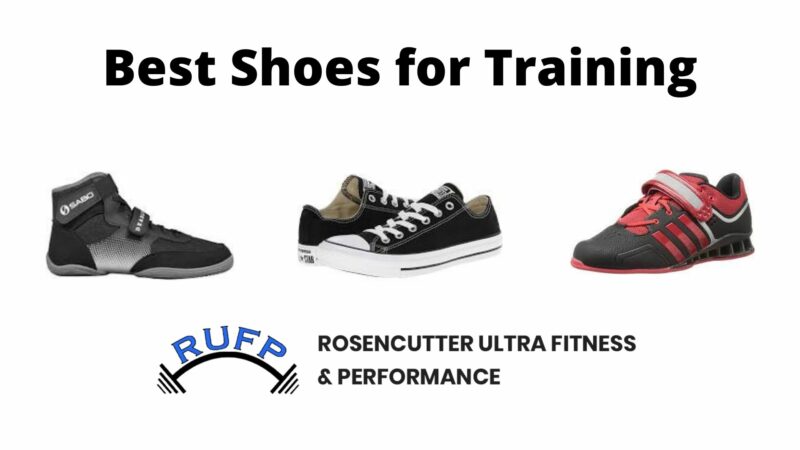
For most people and general lifting purposes, wearing a thin shoe with a solid, flat bottom that allows you to grip the floor with your feet is good. This ability to grip the floor is essential in order to develop appropriate stability, balance and drive through the rest of your body. A classic shoe like a Converse All-Star Chuck Taylor is a great example of this.

A lifting shoe

For those who are serious about squatting and/or doing Olympic lifts with big weights, a lifting shoe is great. These shoes have a very solid bottom and have an elevated heel that helps to align the body better for optimal squatting movement. The super solid sole provides tons of stability through the floor, allowing optimal force driving abilities.  Adidas Powerlifts, Adidas Adipowers and Nike Romaleos are some great options here. These are pretty pricey and unless you are a serious and possibly competitive lifter, are typically not necessary.

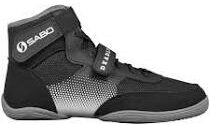
Deadlift shoes are also a great option for (obviously) deadlifts and pretty much everything else (calf raises come to mind), as they are super thin and you can pretty much feel the floor with them on. On top of this, they also have two straps to help provide side to side stability, helping you to lock in to the floor. Sabo Deadlift shoes are a great option.  

Worst Shoes to Wear When Lifting

Shoes with an uneven and/or squishy bottom

Running shoes and basketball shoes are some of the worst shoes to lift in, as their uneven bottoms throw your balance off and make it impossible to get any kind of grip into the floor. Without the ability to grip the floor, you cannot drive force up through your chain into your hips, torso, etc. Its equivalent to trying to grip something with a big, fluffy winter glove on your hand. The uneven design of the bottoms tends to throw you off of your heels, leading to all kinds of potential issues all of the way up the chain. Furthermore, the squishiness of the sole of many running shoes causes you to lose a lot of your force distribution, since when you push into the shoe, the squishiness takes some of your force that you are creating, rather than it transferring directly into the floor. If you are serious about your training, DO NOT wear these types of shoes to lift in.

Examples of Good Shoes for Training

Adidas Adipower weightlifting shoes

Adidas Adipowers

Great for squatting and olympic lifts

Sabo deadlift shoes

Sabo Deadlift Shoes

Great for most exercises

Chuck Taylor shoes

Sabo Deadlift Shoes

Wanna keep it simple? Can’t go wrong with some Chucks

Lifting Heavy in Good Training Footwear

YouTube player

Squatting this kind of weight would not go well with offset, squishy running shoes. Nick has on Adidas Adipowers here (might have to zoom in). Grounding yourself into the floor is essential.

YouTube player

And here Nick is wearing the Sabos mentioned above. Trying to pull 700 in running shoes would be a disaster in the making. Picking up significant weight with your feet wobbling all over is not recommended and will zap you of force output

Hypertrophy, Rep Ranges, and What it all Means

By, Nick Rosencutter

If your goal is fat loss, you need to build muscle. If your goal is sports performance, you need to build muscle. If your goal is injury prevention, you need to build muscle. Muscle growth helps pretty much any endeavor people train for. Obviously not everyone is looking to or needs to build the same amount of muscle. For some people it might be supplementary to their main activity (such as a distance runner) and for others it might be the main focus of their training (such as a bodybuilder); regardless, understanding what is actually going on behind the scenes of your training can go a long way.


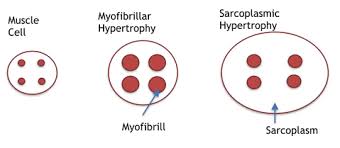
Hypertrophy is the scientific term for muscle growth. In its most basic sense, when we lift weights, we are tearing down muscle fibers (protein degradation) and those fibers then adapt to this trauma by growing bigger and stronger (protein synthesis). While this is the general overview of what happens, its not actually that cut and dry. A muscle fiber is made up of tiny little things called myofibrils. And those myofibrils are made up of even tinier little things called sarcomeres that consist of actin and myosin, which are contractile proteins that essentially grab onto each other and pull, in order to create a muscle contraction. Surrounding all of these myofibrils within a muscle fiber is a fluid filled space called the sarcoplasm. If we are talking about hypertrophy, we need to understand that there is more than one way that it can happen.


One extreme form of hypertrophy is called myofibrillar hypertrophy. (see picture above) Touched on in one of the greatest strength training science books of all time, “Science and Practice of Strength Training,” when this occurs, we are actually increasing the number of myofibrils within a muscle fiber, thereby increasing the density of the fiber. This is an adaptation that occurs to a greater extent in response to heavier lifting with sets in the 1 to 5 rep range. Some people falsely believe that the only way to stimulate hypertrophy is by training with moderate weights for moderate to high reps. The truth is, if you never go heavier and train in this lower rep range, you are largely missing out on an entire form of hypertrophy and you will not develop the muscle density that comes from this type of training. Furthermore, if you never use heavy enough loads to hit this rep range, you will not tap into your highest threshold motor units and their muscle fibers, since they don’t need to fire with weights lighter than this range. (motor units are a part of our nervous system that basically cause muscles fibers to do their job and different threshold units respond to different intensity levels). So both muscle fiber density and certain fibers altogether will be neglected without this type of training. These are reasons why many of the top bodybuilders throughout history have always done plenty of heavy powerlifting style lifting during their training careers. You can always tell who has put in time under a heavy bar and who hasn’t when you look at different physiques.


The other form of hypertrophy is called sarcoplasmic hypertrophy. When this occurs, the sarcoplasm between the myofibrils expands and the substrates (proteins, calcium, ions, etc.) and fluid increase. While you still get some myofibrillar action with this as well, the sarcoplasm expands at a greater rate. This is usually an adaptation that occurs to a greater extent with moderate to higher rep training with moderate to semi heavy weights (5 to 15 rep range). So while these both occur to some extent with both training modes, one is typically leaned on to a much greater extent with each loading and rep range.


Aside from these two main forms of hypertrophy, we can look at two factors playing tug of war when it comes to the stimuli that can make us grow: muscle tension and metabolic response. We create muscle tension by applying load to the muscles that we are training as they move through a high amplitude range of motion and we create a metabolic response by performing sets and reps. If we have too much load, we can’t do enough actual work to get a metabolic response and if we have too little load, we can’t create enough muscle tension to break down proteins and actually make anything adapt and grow. This is why something like distance running or doing sets of 100 with a baby weight do nothing to build muscle. There is not enough load to create any significant amount of muscle tension. You’ll get a metabolic response, but that response is primarily geared towards muscle endurance, which can actually cause those muscle fibers to adapt by getting smaller so that they can be more efficient for their endurance activity. On the other side, its also why doing nothing but heavy singles all of the time would also not do much to build a ton of muscle. There’s not enough metabolic activity to cause any growth. (although the neural adaptations would likely improve significantly) So what do we do?


It has been widely accepted for decades now that the 5-15 rep range is ideal for hypertrophy, the 1-5 rep range is ideal for maximum strength and 15-20+ is ideal for muscle endurance. This has been supported by a good amount of research, by leading organizations such as the National Strength and Conditioning Association and the National Academy of Sports Medicine, as well as in the trenches experience by thousands of lifters over many decades. After looking at the previous paragraph, its easy to see why that 5 to 15 rep range is great for hypertrophy. There is a good amount of muscle tension created via moderately heavy weights and there is a good amount of metabolic response created via that perfectly sweetened rep range. That being said, there are some gray areas here and quite a bit of crossover.

  1. As we already mentioned, training with 5 or less reps can go a long way in developing myofibrillar hypertrophy, stimulating our highest threshold fibers and absolutely must be a part of your training at certain times if you are trying to pack on muscle. Not only does this factor in from a straight hypertrophy sense, but if you are stronger, you can lift heavier weights for your moderate to high rep sets as well, which means more muscle growth.
  2. While the 5 to 15 rep range is great for general hypertrophy and should make up a bulk of training if putting on size or fat loss is the goal, going above this rep range into the 15-30 rep range can stimulate hypertrophy by giving those fibers a different stimulus, hitting different fibers and getting that extra metabolic stress that might not occur if this range is neglected.
  3. Different muscles can and often do respond differently to different rep ranges. Different muscles are made up of varying amounts of slow and fast twitch fibers and some muscles like different stimuli. For example, the quads and the calves both tend to respond well to higher reps at certain times. Banging out 20-50 rep sets on a leg press or 20-100 rep sets on a seated calf raise can help pack muscle onto these two while it might be a waste of time and energy for certain other muscles.
  4. Generally speaking, if your training always consists of nothing but super high 40-50 rep sets then you are not using enough load and there will not be enough muscle tension to give you the muscle growth that you are looking for. These high rep sets can be great for a shock to specific muscles (like mentioned above), great for recovery/blood flow work, great for some extra non taxing work to bring up a weak point, and great for muscle endurance, but should be supplementary if the goal is to build a maximum amount of muscle (regardless of what the unqualified celebrity trainer told you on TV or social media). “But I feel a great burn when I do tons of reps.” See classic high rep crunch workouts for a prime example. That burn that you feel is simply substrates such as hydrogen ions and blood lactate building up in the tissues that you are training and does not have a significant correlation to muscle hypertrophy. We need protein degradation to occur to induce hypertrophy and without enough load and, in turn, muscle tension, this will not occur enough. That being said, saturating a muscle with blood with extra high reps to finish off a workout may definitely have some benefits when used appropriately, especially once the hard and heavy work is done.
  5. Total volume can play a role. While 3-5 sets of 8 to 12 is great for general muscle building purposes and you can’t go wrong with it, multiple sets of lower reps can also stimulate muscle by sheer volume, i.e. 5 to 10 sets of 3 to 5. Sets and reps can be laid out in different ways, although the time under tension will be greater with the 3×8-12 in this example, which has been shown to be important for stimulating hypertrophy.
  6. Efficiency matters. If you are using a load that is significant enough to create adequate muscle tension to force adaptation/growth, you shouldn’t be able to do an excessive number of sets, so 3 to 5 sets of 5-15 reps is usually enough for an effective exercise, and 6 to 8 main exercises should probably be enough for one workout. If you are doing much more than this (barring small accessory/prehab exercises), you are likely not using enough load to get the adaptation you want or are just slacking off. Flashing back to number 5: if you are doing an effective high rep 15-30ish rep set, you are likely only doing a small number of sets. Beyond this, you will either be laying on your back gasping for air/bent over the toilet puking or the load and muscle tension is almost surely insignificant and you are building endurance and promoting blood flow, not much more.

Bonus note: It is the eccentric, or muscle lengthening, component of an exercise that is responsible for most of the hypertrophy improvements that you see. This means that it is the process of lowering the bar down to your chest on a bench press that does most of the damage, not the way up. Therefore, controlling that lowering phase and utilizing different tempos here can go a long way in tearing those fibers down on the way to fresh growth.


There is still plenty that is not known about hypertrophy and more studies to be done. From what is currently understood, when it comes down to it, utilizing a blend of load levels and varying rep ranges is best for optimizing hypertrophy. This is supported by both scientific and in the trenches research. We could also get into plenty of other factors such as neural components, resistance type, tempos, drop sets, rest periods etc. but we’ll save that for another article. How and when to utilize these principles discussed depends on the person and what their situation and task at hand is. This is where the art of programming/coaching and science come together. On top of all of this, if you don’t get enough calories and enough quality protein, the training you do will not matter because without the proper nutrition, your body can’t recover and grow. Now go train and make sure you’re getting enough nutrients to make it count!

Don’t Forget about the Adductors

If there is one thing that I’ve seen since coming into the fitness industry over 12 years ago, it’s the growth in the knowledge of the need for more specific glute work with a large number of people out there living today.       Poor glute function often leads to an overworked low back and/or aggravated knees along with less than optimal movement quality.  The fact that more and more people are becoming aware of this is great; however, there are other players around the hip and leg that are also very important to take care of, and in my opinion, a specific group of these often gets sad because they are not addressed and not included often enough in the conversation.  While strengthening the glute muscles is great to help keep the outer hip solid, people often forget that there is a VERY LARGE section of muscle on the INSIDE of the hip and thigh.  Bring on the adductors!

Read More

The Importance of Variety in Your Training – Part I

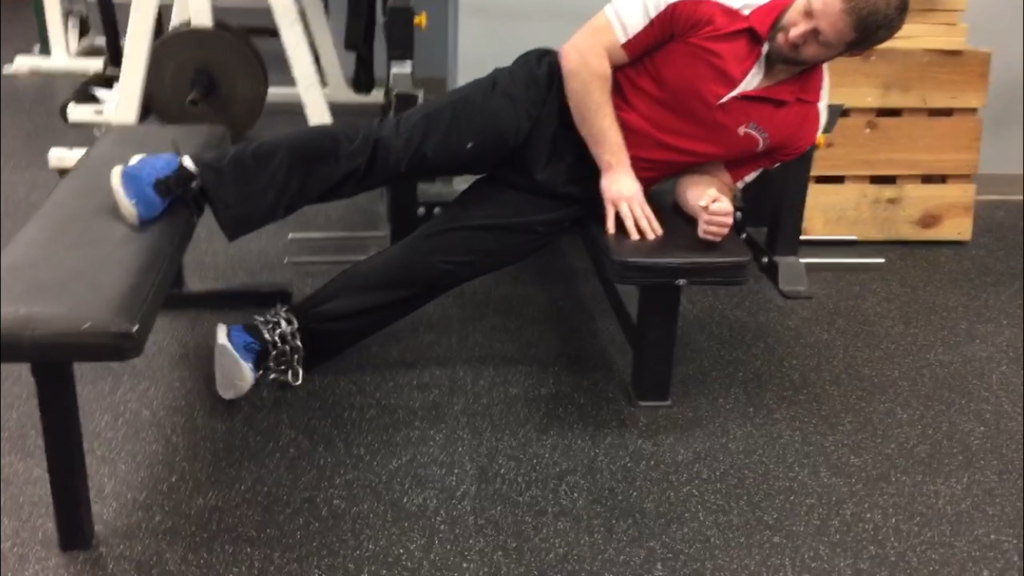
A question I receive fairly often from people starting a new program is, “Why am I doing ‘x’ exercise?” Or, sometimes I’ll hear comments like, “Wow, this program looks a lot different!” Now, if it’s not a program I wrote, but was written by the one and only Nick Rosencutter, I’ll usually just give my default explanation of: he is crazy and wants you to suffer. If, on the other hand, I wrote the program, I will give them my rationale behind why I have them doing…oh I don’t know…hanging single-leg lateral calf raises with a chain for time.

Okay, so maybe it doesn’t get that crazy. However, statements and questions like the two mentioned are valid, and the exercises and sets and reps you are performing do deserve justification and should have meaning behind them. That is an article for a different time.

Read More

Set S.M.A.R.T. Process Goals

It’s the start of a new year and that means one thing is for sure – everyone is making New Year’s resolutions or goals they’d like to achieve this coming year. Oh sure, you may not write them down or tell them to anyone, but you know you still have them. That thought about how you’d like to eat a little less sugar, or how you should really not watch as much T.V. and maybe read a little more. Or how you should be more productive at your job or spend more time with your family, and the list goes on. Maybe you’re the type of person who wrote them down or shared them with someone. In either case, awesome! I am all for having goals and things you would like to achieve, and what a better time than a fresh calendar year. I even wrote a few down myself.

Now, if you’re reading this and you can honestly say you don’t have any goals (yet) or areas of your life you would like to improve, I highly suggest you take a few minutes and think of just a few ways you would like to improve yourself in the coming weeks, months, and year. And not just fitness or health goals. Think of ways you would like to improve your relationships, how to be more productive with your time, or maybe some career goals.

Whatever area of your life you select to focus on improving, here are a couple tips that will make it a little easier and break things down into more manageable steps.

Don’t just set outcome goals, set process goals.

I’ll give you an example:

Outcome goal: I want to lose 60lbs. this year

Process goal: I will eat vegetables with two meals per day and exercise for one hour, three times per week. 

Now, this is a simple example, and it is nothing earth-shattering that no one has ever said before; however, it is something that many of us forget about when it comes to goal-setting or making resolutions. Don’t only think about the big number/goal/achievement! Consider the small steps it takes to get there!

If your goal is to lose body fat and you say you want to lose sixty pounds this year, that may be overwhelming. Instead, if you say, I am going to eat more vegetables and exercise a few times per week (things that will encourage fat loss), the goal seems more attainable.

Or you may break down that goal another way:

Sixty pounds in one year is five pounds per month, which is just a little over one pound per week. That doesn’t sound so bad! Now, if you are consistent with your previous two process goals and focus on one pound per week, all of a sudden your lofty goal of sixty doesn’t seem so far out there.

Set S.M.A.R.T goals.

Setting SMART goals is an awesome way to organize your goal setting and give it a little more structure and definition. I’ll break it down by letter and give an example of each.

Specific

One of the most important keys in setting a goal or resolution is to make sure that your goal is not left open-ended, but has an exact definition, so that you and anyone else you may tell knows exactly what you are wanting to achieve

Non-specific: I want to exercise more

Specific: I will go to the gym and strength train three times per week

Measurable

Having a goal that is measurable is a great way for you to not only track the progress you are making, but also gives you the chance to look back when you’ve achieved it and see how far you have come. Things like calorie amounts, workouts per week, and specific weight loss numbers are measurable. Broad statements about things you would like to do are not.

Bad example: I want to lose weight

Good example: I will lose five pounds per month

Attainable/Achievable

This one may seem like a no-brainer, but you would be wrong. How many times have you known someone who has set a resolution or been determined to accomplish a new goal and a few weeks or months into it they stop and realize it’s too far out there? The purpose of an attainable goal is to make sure that it is actually something you have the potential to achieve! Yes, you want to challenge yourself. But don’t be unrealistic and set such a lofty goal you have no chance of completing it. Set a goal you can ACTUALLY ACHIEVE, not just impress others with.

Unattainable: If you work fifty hours per week and have three children and run a business on the side, it’s probably not realistic for your goal to be to weight train five days per week for two hours each and run three marathons this year.

Attainable: Take the same situation from above (and let’s say that you’re a go-getter):  Weight train two-three days per week, and go for one run per week. If you’re being honest with yourself, that’s probably a little more realistic.

Relevant

This one is fairly straightforward. Make it YOUR GOAL and relevant to you! Not your wife’s, not your boss, no one else’s. It is your goal, specific to you, and something you want to achieve. Sure, others may encourage you or help steer you. But if you yourself are not truly in it and don’t really feel like it, you have already mentally checked yourself out.

Not relevant: Your husband encourages you to start running a few days per week, even though you don’t like running and it makes your knees hurt. But, because he said it and he likes it, it is now your goal for the new year.

Relevant: You enjoy lifting weights and working with a coach. You make it your goal to go and lift two-three days each week.

Time

Last, but certainly not least, is time. You need to put a time-frame on your goal. If you simply say, I want to lose weight, or, I want to eat better, you are leaving your goal extremely open-ended. You give yourself no date by which it must be completed, and therefore you having nothing pushing you and motivating you. On the other hand, if you are wanting to lose weight so you can fit into your wedding dress, there is a specific date that lets you know exactly when you must complete it by.

Putting it all together.

Now that we have broken down each step into pieces, let’s put it all back together with an example.

Outcome goal: I want to lose sixty pounds by January 1st, 2020.

Process goals to help get me there:

  1. I will exercise three-four days per week for a minimum of one hour
  2. I will eat vegetables with at least two meals per day
  3. I will lose, on average, five pounds per month/one-two pounds per week
  4. I will cut out “x” food that I constantly overeat on calories (chips, ice cream, pizza, etc.)
  5. I will write down these goals and put it somewhere I can see it every day and be reminded of it
  6. I will tell one or two close friends that will help keep me accountable and encourage me

Outcome goal: I want to exercise three days per week for the next three months

Process goals to help get me there:

  1. Set specific workout times that you know you can make happen
    1. On Monday’s during my one hour lunch break, I will go down to the fitness center and lift instead of sit on my phone and scroll social media.
    2. When I get home from work on Wednesday’s I will use those twenty pound dumbbells I have sitting in my basement that haven’t been touched in years to do a full body workout.
    3. On Saturday afternoon’s my friend and I will go to the YMCA and work out together and do some swimming for conditioning work.
  2. I will block these time periods off in my schedule so that nothing may take the place of them.
  3. I will write down my workouts so that I can see my progress and improvement, which will help encourage me to continue.
  4. I will write down these goals and put it somewhere I can see it every day and be reminded of it
  5. I will tell one or two close friends that will help keep me accountable and encourage me

So, whether you have made New Year’s resolutions or you simply have goals you would like to accomplish, put these principles into practice and see what they can do for you!
Build a Healthy Roadmap

By Nick Rosencutter

Upper body training. Probably the most popular emphasis of training that you will see if you walk through most gyms throughout the country. Everybody loves pumping their biceps and building their chests up. If you are lucky, you might even find someone who enjoys chiseling out their upper back. While working the upper body might be a very common thing to come across, very few people actually understand how to train it correctly. This is because very few people understand the anatomy and biomechanics of the activities that occur up top. (and if these things were understood even a little bit, those lovely things below the belt called legs would never be neglected).

So, when we look at gym goers who do hit their upper halves a few times a week, we can generally put people into a few different groups.

Group 1- The Bench and Curl All Day Every Day Group. These people love working the muscles that they see in the mirror and do many variations of pressing and curls with some extra delt and tricep work thrown in for good measure here and there. Neglecting the opposing muscles in the back leads to problems down the road and they are left with imbalances and shoulder issues.

Group 2- The Train with some Push-Pull Balance Group. These people at least understand the importance of balancing out pushing and pulling exercises and try to do some kind of pulling exercise to provide some balance to whatever pushing/pressing exercise they might be doing.

Group 3- The Shoulder Mechanics Involve More than 2 Motions Group. These are those in the know that understand the anatomy and mechanics of the shoulder and train movement and muscle around their upper bodies with some decent anatomically balanced precision; often leading to less shoulder issues and better looking and better performing postures.

Digging into this a little deeper, while group 1 is way off of the map, group 2 at least has SOME realization about balancing out the anatomy. So what is it that they are missing that Group 3 is not? That my friends, is the question that we shall answer with the rest of this article.

To understand how to properly train, we must first look at the anatomy and mechanics. I’m going to keep this straight forward and basic so this doesn’t turn into a textbook lesson. The first thing we need to look at is the scapula (known as your shoulder blade in street talk) and the motions it is capable of. The scapula lays on the back of your rib cage and has connections with your clavicle (collar bone) and humerus (arm bone). When we talk about “push pull balance,” we are generally talking about protraction and retraction of the scapulae (although many people don’t get quality protraction even with their pushing), flexion/extension, and on some occasions, internal/external rotation of the glenohumeral joint (what most think of as the shoulder joint) .

While having some balance here is great, we also need to factor in the multiple other possible actions of the scap and gh joint. The scap can also elevate, depress, rotate upward, rotate downward and tilt forward and backward. The gh joint also internally and externally rotates, adducts and abducts. There are certain muscles that help to perform all of these actions. Anytime we move our arm, whether that be forward and backward, out to our sides or overhead and back down, our scapula, gh joint and our thoracic spine all need to move with a certain harmony amongst each other.  When one of these is off, the other(s) must compensate in order to create further motion.  Most commonly, the scapula stops moving or moves abnormally and the humeral head (top of the arm bone) glides either upward or forward to compensate, leading to impingement.  Simply pushing and pulling neglects many of these actions, although if we are talking pushing and pulling both horizontally and vertically we are at least getting closer to the prize.

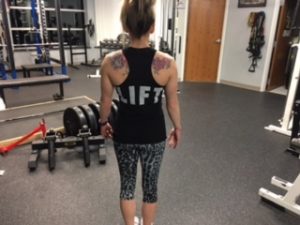
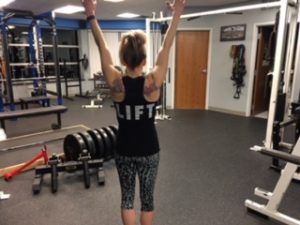
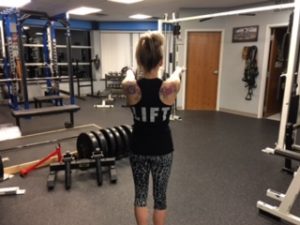
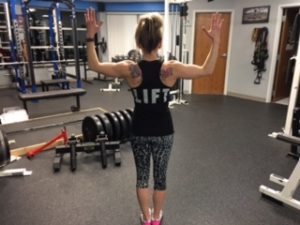
Moving overhead involves multiple pieces, including flexion of the glenohumeral joint, upward rotation of the scapulae and extension of the thoracic spine


Pulling with good protraction of the scapulae and pushing with good protraction of the scapulae

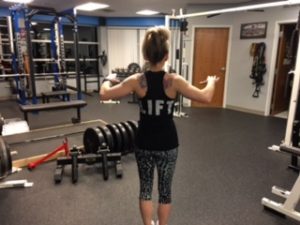
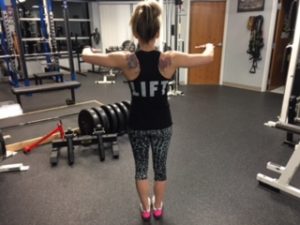
Internal and External Rotation of the shoulder joint (in this instance while the scapulae are in a bit of retraction)

When we look at the most common pushing exercises that are performed, the bench press is definitely towards the top of the list. When we look at pulling exercises, a row variation is towards the top of the list as well. When done correctly, the row will work the rhomboids, mid traps and low traps, the main muscles that pull the scapulae into retraction (they pull your shoulder blades together). When done correctly, the bench press will work your pecs, anterior deltoids and triceps with the actual motion of the press; however, a correct set up involves pulling the shoulder blades together (retraction, as we learned a couple of sentences ago, which also utilizes the rhomboids). When we do too much pressing like this, without any protraction of the scapulae and pair it with straight rowing exercises, we end up getting what we call anterior glide of the humerus, where the top of your humerus (arm bone) moves towards the front of your shoulder joint, creating impingement.  This occurs because when the scapulae fails to protract sufficiently during a push motion, the humeral head compensates by moving forward in the shoulder socket excessively (anterior glide); this ends up happening if we never train scapular protraction with our pushing movements.  (Similarly, if our scapulae stop upwardly rotating when we move overhead, the humeral head tends to glide UP in the socket, causing impingement at the top of the joint)

To add further complication, when we add in any kind of shrugging exercise which involves elevation of the scapulae, the rhomboids are under pressure even more since they also assist with elevating the scapulae. Throw in some pulldowns or pullups, which involves downward rotation of the scapulae, which also activates the………guess what?………the rhomboids! So while at first glance, you might think that many people would need lots of rowing and pullups to balance out all of their pushing, you can now see that its not so black and white. When you add in the fact that any kind of pressing exercise and any kind of vertical pulling exercise also involve internal rotation of the shoulder joint, we can start to see some patterns occurring. Pecs, lats and deltoids often become overactive, pulling the shoudler joint into internal rotation and, along with the rhomboids becoming overactive, limiting protraction and upward rotation of the scapulae. While many of these people do have overactive rhomboids, many of them do still need to “open up” their shoulders. So how do we do this without creating further complications?

  1. We need to balance out the types of pushing exercises we do, being sure to include exercises that allow us to get protraction and/or upward rotation of our scapulae

  1. We need to train upward rotation of our scapulae and external rotation of our shoulder joints and/or do this ALONG with retraction.

  1. Some people might be excessively depressed and some excessively elevated. This must also be factored into any programming.

  1. Balancing out our pushing exercises

Rather than just bench pressing, incline bench pressing, decline bench pressing etc. we need to do some pushing that allows us to move our scaps freely. Landmine presses, cable pushes, overhead presses, and pushups are some great ones. These allow us to get either quality protraction or upward rotation, or some combination of the two. Ensuring that our scapula is able to move effectively in these pathways will better allow our humeral head to stay centered in the glenoid fossa (shoulder socket), preventing impingement and keeping our shoulders healthier.

YouTube player
  1. Training our scapulae to upwardly rotate and stimulating the external rotators of our shoulder to help counteract all of the internal rotation going on are essential. Beyond that, we need to train some retraction without the rhomboids taking over. Y variations and basic external rotation variations are great ways to take care of the first two. Face Pull variations are a great way to conquer our third mission here. With a face pull, our scapula is in a position of upward rotation as we pull towards our head. Since rhomboids are also downward rotators of the scapulae, this takes them out of the movement to a certain extent and allows our mid and low traps to do more with the retraction of the exercise. So we have retraction with good recruitment of the mid and low traps in a position of scapular upward rotation, which is great. Add in the fact that we also get some external rotation at the shoulder joint as we pull, and you have a phenomenal exercise that can really do a lot to help balance out all of the issues that we talked about earlier. Both double and single arm variations work well here depending on the situation and person at hand. If there is side to side imbalance going on (one scap is positioned or moves differently than the other) then it is usually best to start with single arm face pulls.


YouTube player
  1. If somebody is excessively elevated in their shoulder girdle, it is important to be sure that they do not shrug up as they perform these pulling exercises as this will add to the tension that they most likely feel quite often through their necks and shoulders. Performing a high to low face pull might also be a good idea to encourage some depression of the shoulder girdle as you pull. Being sure to keep the shoulders down and back on most pushing and pulling exercises is important here as well.

YouTube player


If somebody is excessively depressed, we need to get their shoulder girdle back up to a respectable level to allow optimal movement and to provide better support for the neck. These people often feel like their neck is “tight,” since its always being pulled on and stretched with the scapulae sitting lower than they should be. Factoring in the possibility of rhomboids being overactive from our earlier examples, we need to train elevation without overworking them more. Enter the Y shrug. This exercise allows us to engage the upper traps to help pull the scapulae up without adding fire to the rhomboids and levator scapulae, while also encouraging positive upward rotation of the scapulae via the lower traps, upper traps and serratus anterior muscles. Check it out above.

While I could go on all day about more factors that could possibly be considered in our shoulder puzzle and this is by no means an exhaustive list, these tips can and should go a long way in helping you to achieve a better balance around your joint; not to mention they should also help improve your lifts and your physique if those are goals of yours. After all, you can’t have a full road map on your back without hitting all of the muscles that are part of it.

In case you didn’t watch this video earlier, check it out now.  We go through a lot of the anatomy considerations mentioned in the article and it should help put some of the things mentioned earlier together for you.

YouTube player

RUFP Powerlifting

RUFP members competed at the 2016 WI State Fair Open and won Overall Best Lifter,  the Female Division, the Teen 18-19 year old division, and Men’s Open 181-220 Division; and placed 3rd in the Mens Open 180 and Under Division.  Check out the compilation video below to see the lifts.  Great Job Everyone!


YouTube player
e-book

Fifth Dimension Fitness presents...

Tired of not getting the results you want?

Get our FREE e-book when you sign up for our newsletter and get started on the road to success!

Get the FREE book!

This will close in 0 seconds