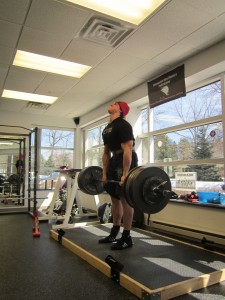
Today, we have an awesome article on deadlift technique from our coach Dan Zwirlein. Dan is a phenomenal coach and trainer and is a great deadlifter, having pulled over 700 lbs on multiple occasions in sanctioned competition. If you want to improve your deadlift, hes a pretty good person to listen to. Get your notebooks ready:
—————————
Between the three powerlifts (squat, bench, deadlift), the deadlift is the least technical of the three: Get mentally prepared and just grip and rip. While I will concede that this is somewhat true, it would be a mistake to not approach the deadlift with the same technical mastery as the other two lifts. Now, there are already many comprehensive articles and videos on the internet about deadlift technique and programing, so the scope of this article is to try to present some different things to think about that will help in your technical approach to the deadlift.
Using a top down approach to set up
Setting up for the conventional deadlift is very individual depending on factors mostly revolving around your anthropometry and weight. Taller and heavier lifters probably need to start farther away from the bar to get into proper position than shorter and smaller lifters. A good way to play around with proper starting position is to stand with a bar and perform a top down deadlift. This should be done with a neutral spine position that can be maintained throughout the entire range of motion. As the bar gets to the knees, the shins should be vertical, from there you can play with how far your knees go over the bar as you bring it down to the floor. Test and retest where you place your feet and find a position that you can get into while simultaneously maintaining a neutral back position to pull from. This is similar to what Mark Bell calls “reverse engineering the deadlift”. Other things to play around with are how much you externally rotate your feet and how wide you grip the bar. A place to start from is a slight toe out and hands wide enough so that they aren’t rubbing against your legs as you pull. The key is to find a position where you have an slight arch in the low back and as close to a neutral position as you can get in the mid to upper back.
Create tension throughout, not just in the upper back
A lot of articles on the deadlift mention pulling “slack out of the bar” but don’t mention how that should be done at the same time as your hips drop into position. If you just pull slack out of the bar without using it to build tension throughout the body, it’s not going to do much in the way of helping to break the initial inertia of the bar. You should use the “slack” to help drive your feet through the floor while building tension through the lats and upper body so the entire body is under the tension of the bar. This helps take away any feedback from the bar and ensures a proper position at the start of the pull. I think the best display of this is to watch Mike Tuchscherer set up for the deadlift. As he swings his hips down his chest opens up wide and his lats tighten down pulling the scapula into a depressed but not retracted position. The bar never pulls him out of position because he uses the natural bend in the bar or “slack” to create tension throughout his entire body from his starting position. However, for bigger and taller lifters this becomes a hard position to get into. As mentioned before, you need to find a position that works for you but still puts you in a good position to pull from. A lot of times this means some rounding in the upper back, which is a lot less dangerous than flexion in the low back if you can maintain the same curvature throughout the spine from start to lockout.
Use a “First Pull” to maintain tension
Once tension is built in the starting position, a first pull needs to occur in order break the initial inertia of the bar off the floor. A lot of times people will just try to rip the bar off the floor and it will move quickly until mid-range, slow down, and then the lockout will be very difficult. This also pulls the back out of a neutral spine position and forces the lifter to lockout with his hips too early, and then they finish the lift with all back extension, hence the reason the lockout becomes difficult. The approach should be to lift fast but not to the point where the upper body loses tightness and a neutral position. I have suffered from this problem myself but have gotten away with it by being able to generate enough speed off the floor to carry all the way to lockout. This is where getting setup properly will help. Speed will suffer from the floor, i.e. the bar will move slower, but proper alignment and tension in the set-up will make the midrange and lockout easier. This is where playing around with your alignment can help too. The goal is to find the sweet spot where you can generate enough speed off the floor but not pull yourself out of position.
Midrange to lockout considerations
Midrange to lockout is simplest in terms of technique. Bring the bar into the body, squeeze the glutes, and pull the shoulders back. Where people get into trouble is when the hips and or knees lockout before the torso is upright. Like in the example I talked about before with the hips driving up too fast, it’s really difficult (and dangerous) to lockout heavy weights with just back extension; especially when the back is in a flexed position. Ideally, all three should lockout together. Once again, if you set-up correctly and maintain relatively the same upper body position throughout, then the lockout becomes easy because you are in a position to extend the hips, knees, and back at the same time.
If your deadlift progress has stalled, the initial reaction is to assume another special exercise needs to be added but most of the time the simplest answer is usually the right one…your technique needs improvement. Hopefully I gave you some small but profound things to think about from setup to lockout that can help in your technical mastery of the deadlift.
-DZ

